A DNS cache is also called as DNS resolver cache, it is a temporary database which is created by the operating system (Windows, macOS, Linux), that is store all DNS record which is visited and try to visit, websites and related to other internet domains.
In simple word you can say it is a temporary memory where it is stored all the recent DND records which helps your computer to get the quick results when you visit the website.
DNS Cache Working
DNS is the most important thing on the Internet because it plays the most important role in it. Internet-only works on IP address but DNS makes it possible to work together and make it easy. For example, we know many websites but we don’t know their IP addresses. If we type techdhee.in then your browser sends the request to your router and your router sends it to the internet and gets the all information and shows in your browser. And DNS cache-store all values in the database like record name, type, data length, section, and IP address of the website. In Windows, you can check by your self, you have to open the command prompt and type the following command to check the stored local DNS cache.
ipconfig /displaydns
C:\Users\techdhee>ipconfig /displaydns
Windows IP Configuration

www.google.com
----------------------------------------
Record Name . . . . . : www.google.com
Record Type . . . . . : 1
Time To Live . . . . : 70
Data Length . . . . . : 4
Section . . . . . . . : Answer
A (Host) Record . . . : 172.217.166.228
So here you can see the Record name and the IP address of the given hostname (www.google.com).
Clear DNS Cache in Windows
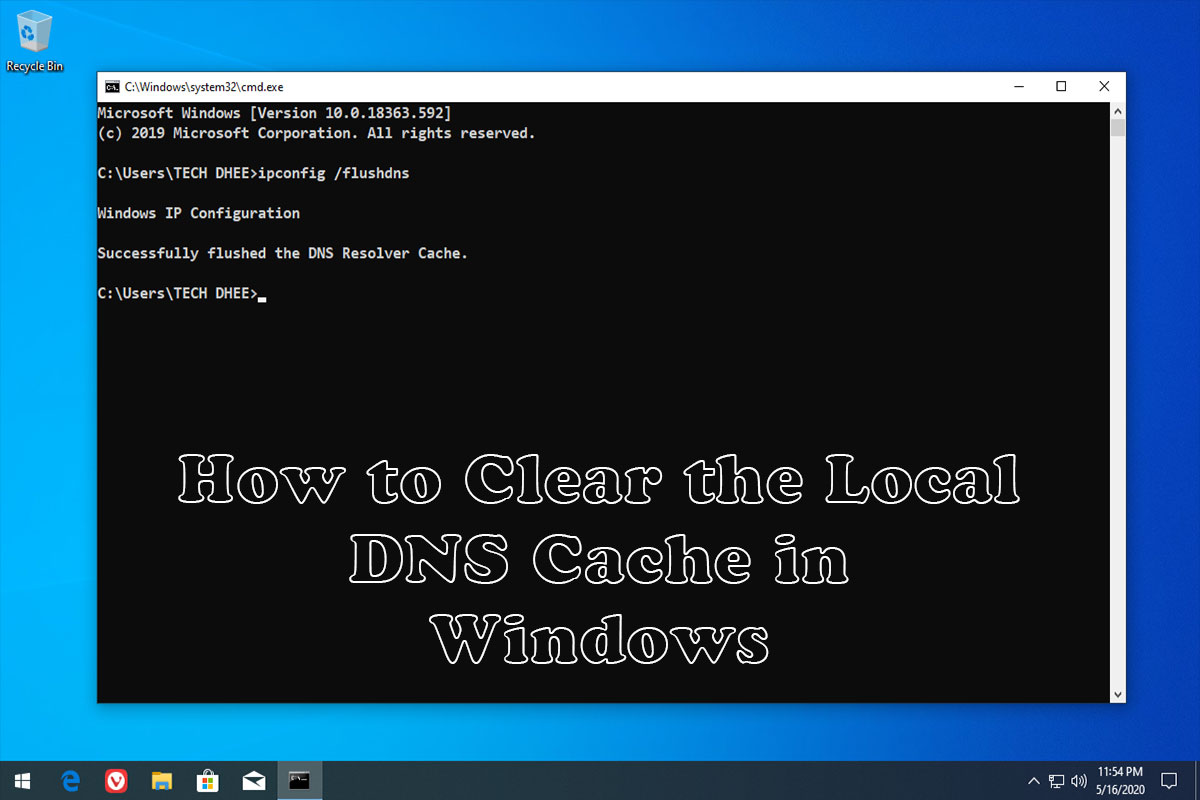
Many times we are facing network issue and we are not getting the results as much so that time we have to clear the DNS cache so we will fix the network issue. In windows 10 you can clear the DNS cache type the following command in command prompt.
ipconfig /flushdns
Microsoft Windows [Version 10.0.18363.592]
(c) 2019 Microsoft Corporation. All rights reserved.

C:\Users\TECH DHEE>ipconfig /flushdns

Windows IP Configuration

Successfully flushed the DNS Resolver Cache.

C:\Users\TECH DHEE>
Note: Run this command 3 to 4 times to get a better result.
When you get the above message that means you DNS cache removed in your operating system. To verify this command work or not you can check using ipconfig /displaydns command.
C:\Users\TECH DHEE>ipconfig /displaydns

Windows IP Configuration

C:\Users\TECH DHEE>
Video
In this video, I will show How to Clear the Local DNS Cache in Windows step by step
Finally
Thank you for reading this post and keep connected to TECH DHEE to continue enjoying excellent posts. Share your views about this post in the comment section below. If you still have any queries, throw it in the comment section. If you find this post helpful, don’t hesitate to share this post on your social network. It will only take a moment, and also it is quite easy and useful for others.
Related Topics: